
For me backpacking was the natural progression from day hiking. As my day hikes got longer and more technical I couldn't fit all the places I wanted to go in one day, so I had to start backpacking. Since I already day hiked quite a bit, I had a lot of what I needed. The rest I bought in stages at REI, Craigslist, and Ebay so I could keep my costs low while still remaining lightweight.
When I first looked into backpacking I was overwhelmed by suggestions I had seen about $500 tents, $400 sleeping bags, and other expensive gear that was "essential." I couldn't pay that much for a hobby, so I had to start on Craigslist. I was able to find a set of gear including a Kelty Tioga backpack, 0 degree sleeping bag, 1-person tent, MSR Whisperlite stove, and a few other items. From there I was able to slowly upgrade my gear as I saw fit. This is the order I would recommend buying your gear in and what to look for when buying.
The Big 3
Often referred to as the Big 3, your sleeping system, backpack, and shelter are the three most important and usually heaviest items you'll need to buy.Backpack

Sleeping System
Sleeping Pad

When sleeping out on the cold hard ground it's important to have a warm sleeping bag and a comfy sleeping pad. The pad isn't just to make you comfortable, it helps keep you warm and insulates from the ground. An inflatable pad is often most comfortable and offers good insulation and packability, but they're expensive; they sometimes can cost upwards of $200. They also can pop in harsh conditions and tend to be noisy when sleeping on them. The best choice for beginning backpackers are often foam pads. Foam pads are light, cheap and work pretty well. They usually aren't as comfortable as inflatable pads, but are much more durable; it's pretty much impossible to destroy a foam pad. Foam pads also aren't as compact and are usually strapped to the outside of the pack. But if you're fine with the cumbersome size, they're the cheapest option, often costing only $10. I use a Thermarest Z-Lite Sol for it's folding size and low cost. I would like to upgrade to an inflatable pad sometime, but the cost is a major deterrent to me.
Sleeping Bag

Stoves
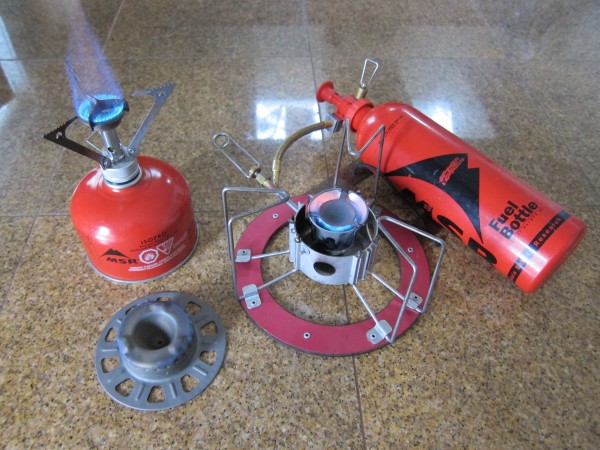
Camping and backpacking conjure up images of sleeping under the stars and cooking over a fire. Sleeping under the stars is still recommended, but cooking on a fire has been replaced with the hiss of a stove. Fire is unsustainable and not approved in many locations, so we have to go with the next best thing. There are 3 basic stove fuels, liquid white gas, butane/propane gas mixes, and alcohol/other fuel types.
White Gas
White gas is the oldest style stove but remain a classic today. They're heavier overall, but much more efficient in cold weather where gas stoves flounder and sputter. They also use white gas or similar fuels in a refillable bottle, not those half-full gas canisters that tend to accumulate in your closet at home. White gas stoves are dependable, great for simmering or real cooking, and boiling large amounts of water for groups or melting snow.
Butane/Propane
Butane/propane blends are the most popular stoves for their ease of use, low price, low weight, and packability. They light easily and offer quick boiling times, especially when used with a heat exchanger pot system like the MSR Windburner or JetBoil systems. As hinted at earlier, gas stoves are problematic when it comes to the fuel canisters. When you only use half or three-quarters of the canisters the rest seem to sit around and collect. And when going on longer or thru-hikes the question of canister disposal comes into play. They also don't simmer as well as white gas stoves do.
Other Fuels
There are many other fuel sources that can be used including alcohol, esbit, wood, and others. These tend to be more popular with SUL and endurance hikers. Alcohol stoves can be lighter than gas stoves and offer the fuel advantages of white gas, especially on long distance hikes where fuel sourcing can be tricky. Each of these have their specific advantages but won't be discussed in depth here.How to Choose
When I first got in to backpacking, I had an MSR Whisperlite but it was too bulky and heavy for the kind of hiking I wanted to do. Big5 had a great stove/mess kit combo for $50 that fit my needs perfectly. I'm currently looking more at alcohol stoves for their lightweight and small size as I'm pursuing lighter and faster hiking. Do the research and find what works for you. There's no wrong way to backpack, so HYOH.
Bear Canisters

Whenever traveling in the Sierra or any other areas where bears are a frequent problem, it's best to carry a bear canister. In addition to being a good idea, it's also mandatory in high usage areas like Rae Lakes and Whitney Portal. Unlike other gear, the bear can is a relatively easy piece to buy as there are few options to choose from. There are essentially 4 main choices when it comes to bear-proof food storage: Garcia Backpackers' Cache, BearVault, Bearikade, and the Ursack. Calipidder has an amazing article outlining the pros and cons of different designs, and I doubt I can do her any justice. I will say that my first can was a borrowed Garcia before I upgraded to the BearVault BV-500. I really like the see through sides and tool-less lid. I'm starting to look at the Ursack for it's lightweight and compactability, especially on weekend trips. Don't worry about buying right away or if you aren't planning on backpacking that often, the National Parks and Forest Service often rent these canisters at the trailhead for a small fee. Plus, you can also rent canisters online for lower prices than buying.
Clothing
The clothes I take backpacking are dependent on the conditions, trip and location, but mostly consist of my dayhiking gear plus extras if I need them. You can find that list HERE. If I'm just going on an overnighter or for the weekend, I'll check the weather and plan accordingly. Most places I can get to in a day in the Sierra don't get that cold, so I rarely pack more than a light jacket. Along with an underarmour shirt and rain shell I can stand temperatures down to freezing. If it's any colder I'll be in my sleeping bag. Same goes with rain gear, if the forecast looks good, I won't bother with full rain pants or jacket, a shell or plastic poncho is good enough for me. I've hiked in the rain before and it wasn't cold enough for me to want anything else, but YMMV. My sleeping clothes also change trip to trip depending on how I feel when packing. Sometimes I'll take long underwear so I can wear it under my pants if it's really cold; other times I like fleece sweats because they're softer and roomier, even though they're heavier. I wear an underarmour long-sleeve shirt to bed, and it's one of my favorite hiking items. I also wear a beanie and a buff/handkerchief when it gets cold. This isn't a hard set list, and I often leave items at home if I know it's going to be warm or take extras if it's going to be colder, it's my basic wardrobe and what I start out with when packing.
No comments:
Post a Comment